Troubleshooting Window Film Installation: Diagnose and Fix Common Problems
Could a bubble under window film be harmless moisture, or a defect that needs correction? When troubleshooting window film installation, acting too soon can turn a normal curing symptom into damage. Waiting on a genuine adhesion or contamination problem, however, can leave a flawed finish in place.
It’s reasonable to want a clear answer before reaching for a squeegee, pin, or blade. Small water pockets and temporary haze may change as film cures, while larger clear bubbles, creases, debris, or lifting edges can point to installation issues. The symptom alone may not be enough to identify the cause. When it appeared and how it changes also matter.
This guide helps you match visible problems to likely causes and choose a proportionate next step, from allowing more cure time to correcting a localized defect or replacing the film. You’ll learn what not to touch, when to check manufacturer guidance, and how preparation, technique, and suitable tinting tools can help prevent repeat failures. Diagnose first, then act with care.
Key Takeaways
Start with the visible symptom, then note the film type, substrate, installation stage, and when the issue appeared.
Bubbles, haze, and edge changes can have different causes, so check the conditions before choosing a correction.
Follow a step-by-step troubleshooting window film installation process and verify film-specific guidance before attempting a repair.
Check the substrate, work area, film identification, and tool condition before installation to reduce preventable defects.
Use a consistent final inspection to catch edge issues, debris, creases, and uneven appearance before considering the job complete.
Troubleshooting Window Film Installation: Start With the Visible Symptom
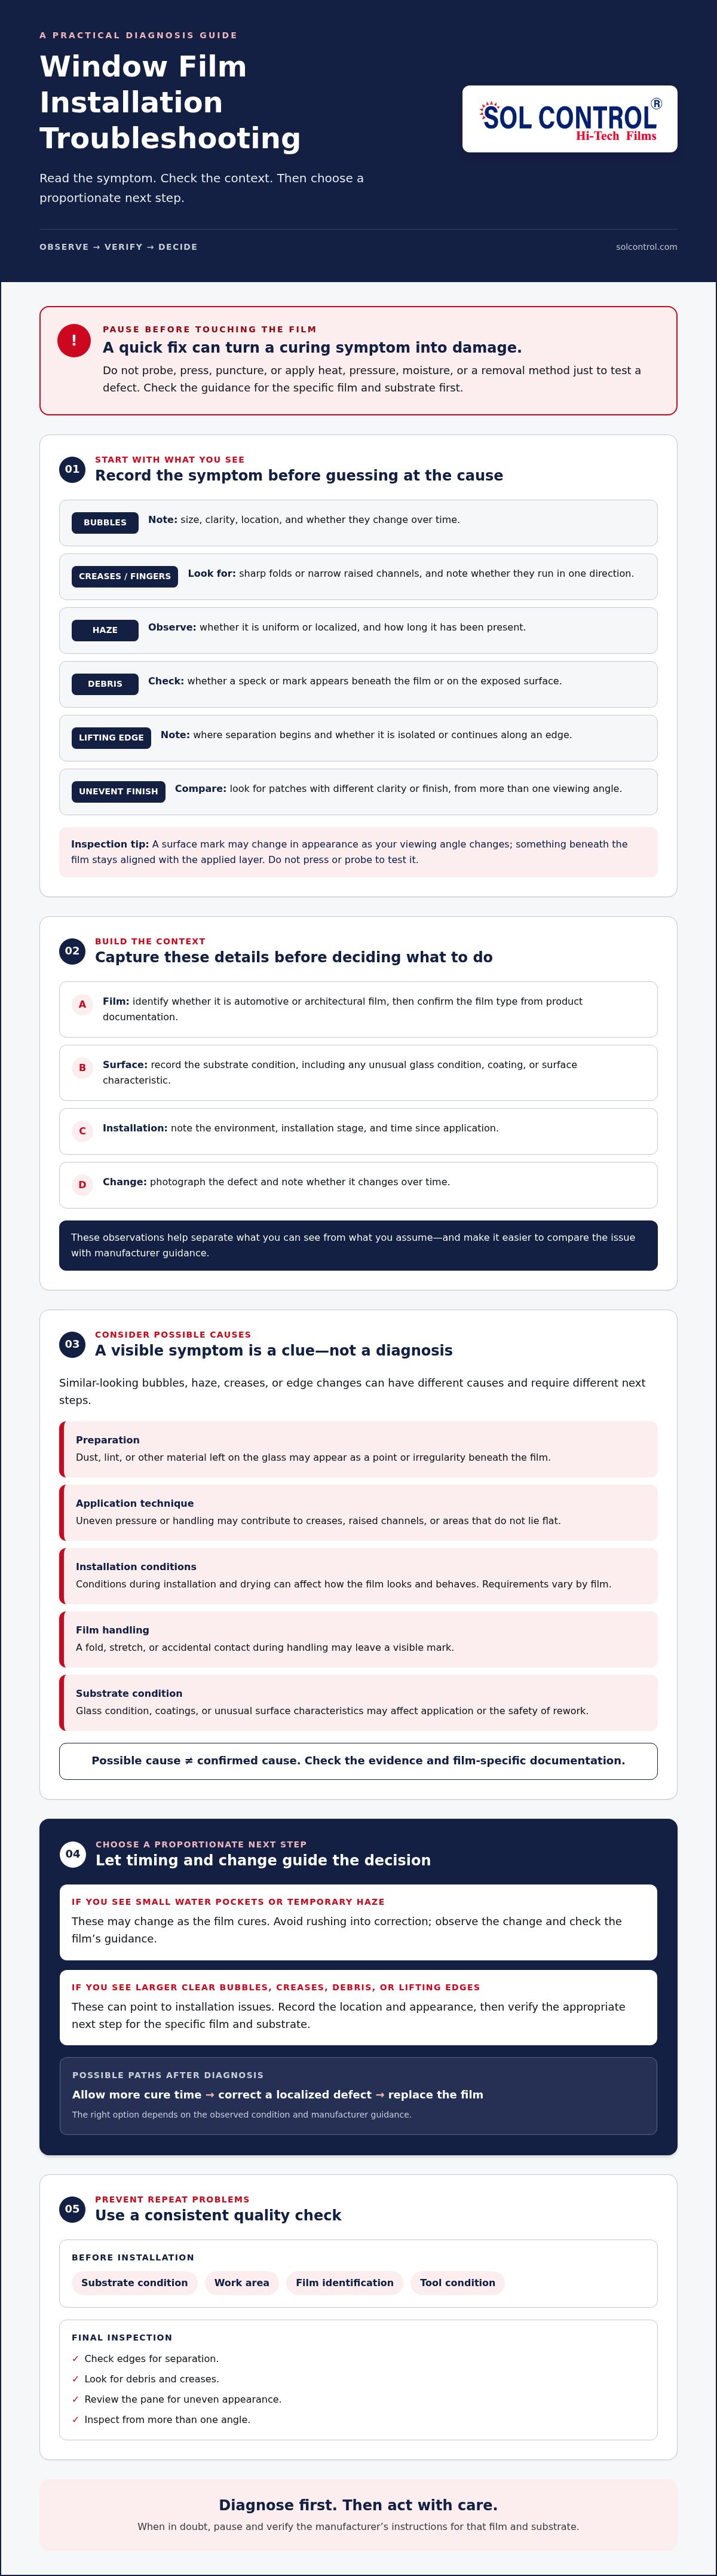
Begin with what you can see, not what you assume caused it. A bubble, crease, or lifting edge can have more than one explanation, and a premature correction may make the problem worse. When troubleshooting window film installation, record the symptom and its location before deciding what to do.
Visible symptom
What to check first
Bubbles
Note their size, clarity, location, and whether they change over time.
Creases or fingers
Look for sharp folds or narrow, raised channels, and check whether they run in one direction.
Haze
Observe whether it is uniform or localized, and record how long it has been present.
Debris
Check whether a speck or mark appears beneath the film or on the exposed surface.
Lifting edges
Note where the film separates and whether the lift is isolated or continues along an edge.
A film-installation defect is a visible symptom that needs diagnosis before correction, not proof of a specific cause. Similar appearances can result from different conditions. Window film is applied to glass for a range of uses and properties; a brief overview of Window film can help orient readers, but repair decisions should be based on the specific film and its documentation.
Which window film installation problems are visible first?
Bubbles look like raised pockets; trapped contamination may appear as a speck or irregular mark beneath the film. Creases are visible folds, while “fingers” are narrow, raised channels. Edge lift shows separation near the perimeter. Uneven appearance can show up as patches with different clarity or finish. Inspect from more than one angle: a surface mark may shift in appearance as your viewing angle changes, while something beneath the film stays aligned with the applied layer. Don’t probe or press the area to test it. Note whether the issue affects one spot, an edge, or most of the pane.
What should an installer check before attempting a fix?
First confirm whether the application uses automotive or architectural film, then identify the film type from product documentation. Record the substrate condition, installation environment, stage of the installation, and time since application. Photograph the defect and note whether it is changing. These details separate observations from assumptions and make it easier to compare the condition with the manufacturer’s guidance.
Before applying heat, pressure, or moisture, or trying a removal method, check the manufacturer’s instructions for that film and substrate. Recommendations can vary. If the guidance doesn’t support a proposed correction, pause rather than risk damaging the film or glass.
Why Bubbles, Haze, Creases, and Lifting Edges Develop
A visible symptom is a clue, not a diagnosis. Contamination, trapped moisture, and application technique can produce similar symptoms but call for different next steps. Before correcting anything, consider how the surface was prepared, how the film was handled and applied, the conditions during installation, and the condition of the substrate.
Preparation: Dust, lint, or other material left on the glass may appear as a point or irregularity beneath the film. A surface mark can look similar, so check its position and appearance without probing it.
Application technique: Uneven pressure or handling may contribute to creases, raised channels known as fingers, or areas that don’t lie flat. These are possible causes, not proof of a particular error.
Environment: Conditions during installation and drying can affect how the film looks and behaves. Don’t rely on a universal temperature, drying time, or pressure recommendation. Verify the requirements for the specific film.
Film handling: A fold, stretch, or accidental contact during handling may leave a visible mark. Check its shape and location before deciding whether handling played a role.
Substrate condition: Glass condition, coatings, or other unusual surface characteristics may affect the application or the safety of rework.
How preparation and application can create visible defects
A tiny point beneath the film could be trapped debris, but visual inspection alone may not confirm what it is. A crease or finger might relate to film handling or application pressure, yet its appearance doesn’t establish the cause. Check whether the issue is beneath the film, where it sits, and whether it changes. Avoid pressing, puncturing, or applying heat as a diagnostic test.
How film type, substrate, and conditions affect diagnosis
Automotive glass and architectural glazing shouldn’t be assumed to use identical procedures. Film construction, substrate, coatings, and installation conditions all matter when assessing a symptom and considering rework. A method appropriate for one film may be unsuitable for another. Confirm film-specific recommendations with its manufacturer before using heat, moisture, pressure, or removal techniques. If glazing has unusual coatings or other uncertain characteristics, seek technical review before proceeding.
For broader visual-quality context, consult the IWFA Visual Quality Standards resources alongside the film manufacturer’s instructions. Reliable troubleshooting window film installation means matching the symptom to the product and substrate rather than applying a one-size-fits-all fix. For installers reviewing their supply needs, SolControl provides window films and tinting tools as a wholesale distributor.
Is It Temporary Haze or a Window Film Installation Defect?
Newly installed film may look different as it dries, but not every bubble or cloudy patch should be treated as normal. Appearance and curing guidance vary by film and application. Use the product manufacturer’s instructions to assess expected changes, and compare what you see over time before attempting a correction.
Symptom
Timing
Does it change?
Next diagnostic step
Small, hazy water pockets
Appeared soon after installation
May shrink or change as the film cures
Check the manufacturer’s curing guidance and observe without pressing or puncturing.
Cloudy or hazy appearance
Present after application
May lessen, stay stable, or become more noticeable
Document its location and appearance, then compare with film-specific instructions.
Large, clear bubble
Appeared during installation or later
Persists, grows, or returns
Record its size and location; ask the installer or manufacturer to assess the film.
Crease or trapped debris
Visible from the initial inspection
Typically remains in the same place
Inspect closely and seek advice before trying to lift or manipulate the film.
Lifting edge
Appeared after application or developed later
May spread or remain localized
Photograph the edge and check product guidance before attempting repair.
Which post-installation changes may need observation first?
If the manufacturer’s instructions describe a curing period, note whether a condition is shrinking, stable, spreading, or changing shape during that period. A small, uniform, hazy pocket soon after application may be consistent with trapped moisture, but appearance alone can’t confirm that. Don’t assume a particular haze or moisture pattern will disappear. Record observations from consistent viewing angles and follow the film-specific guidance.
Not every visible bubble needs to be punctured or pressed. Those actions can damage the film or glass and may turn a condition that needed observation into a repair. Avoid using heat, moisture, or tools unless the product instructions specifically support that approach.
When does a symptom point toward correction or reinstallation?
A crease that remains, visible contamination, film damage, or an edge that continues lifting warrants closer assessment. These signs don’t automatically mean the whole pane needs replacement. Location, severity, film type, substrate, and manufacturer guidance all affect whether a localized correction is appropriate or reinstallation is necessary.
For effective troubleshooting window film installation, photograph the condition, note when it first appeared, and track any change. If it persists beyond the manufacturer’s stated guidance or worsens, consult the installer or the film manufacturer’s technical support. Don’t attempt an invasive fix until you’ve confirmed it’s suitable for that specific film and glass.
How to Troubleshoot Window Film Installation Step by Step
A consistent workflow helps prevent a small appearance issue from becoming a costly repair. Before acting, confirm whether the film is automotive or architectural. The substrate and product instructions matter, so don’t assume a correction suitable for one application will work for another.
Document the condition. Photograph the affected area and record the film type, substrate, installation stage, and when the symptom first appeared. Note whether it is stable, spreading, or changing shape.
Classify the symptom. Describe what you see, such as haze, a bubble, a crease, trapped debris, or an edge lifting. Record whether it affects one spot, the perimeter, or a larger area. Keep observations separate from assumptions about the cause.
Inspect without disturbing the film. Look at the condition under consistent lighting and from more than one angle. Check whether a mark appears on the film surface or beneath it, but don’t press, puncture, or lift the film to find out.
Verify product guidance. Confirm the exact film type using product documentation. Review the manufacturer’s recommendations for the film, substrate, curing, and any permitted repair method. If the instructions are unclear, pause and ask the manufacturer or an experienced technical resource.
Select a proportionate correction. Consider a minor adjustment only if the manufacturer approves it for the diagnosed condition. Persistent creases, contamination, lifting, or damaged film may need assessment for replacement rather than a surface-level fix. Confirm that any tool or material is compatible before proceeding.
Recheck and document the result. After an approved correction, inspect the affected area, nearby edges, and overall appearance under the same viewing conditions. Record what changed and whether the symptom returns. That history can help identify patterns in future installations.
Choose tools and corrections with care
A tool is appropriate only if it matches the task and the film manufacturer’s instructions. Puncturing a bubble can leave permanent damage, while applying heat without guidance may affect the film or substrate. Avoid generic pressure, temperature, or moisture techniques. For a manufacturer-approved adjustment, select suitable professional tinting tools and follow the documented procedure. The related article, Professional Tinting Tools: The Installer’s Kit, offers a broader look at tool selection.
If the cause or safe correction remains uncertain, don’t escalate by trial and error. Refer the case to the film manufacturer or an experienced technical resource, especially if the symptom worsens or returns. For professional tinting tools that support a repeatable workflow, explore tinting tools from SolControl.
Prevent Repeat Window Film Installation Problems With a Quality Check
A consistent quality check helps catch preventable issues before they become rework. Use film-specific documentation and repeat the same preparation and inspection steps across jobs. If a defect recurs, recorded details can help show whether the pattern relates to the substrate, work area, film handling, or tools.
Which checks reduce the chance of defects before installation?
Before starting, confirm that the film is suitable for the application and substrate by checking the manufacturer’s technical documentation. Inspect the glass for visible residue, damage, coatings, or unusual conditions that may need technical review. Prepare the work area and check that the film is in suitable condition to handle.
Substrate: Inspect the glass and note anything unusual that could affect the application.
Work area: Check that the installation space and materials are prepared according to the film instructions.
Film identification: Confirm the film type and intended application. Don’t assume automotive and architectural films use the same procedures.
Tools: Check that tools are clean, in good condition, and appropriate for the task.
Job conditions: Record relevant environmental conditions and job details if they could help explain a recurring issue.
These checks don’t guarantee a defect-free result, but they make the process more controlled and help installers spot gaps in preparation. Keep product documentation accessible so application, curing, and inspection decisions follow the guidance for the specific film.
How can professional tools support a repeatable process?
Task-appropriate tools support consistent handling and application, but each tool must suit both the task and the manufacturer’s instructions. A tool alone can’t compensate for an unsuitable substrate, contamination, or incorrect technique. Review Professional Tinting Tools: The Installer’s Kit for a broader look at tool selection, and use product guidance to confirm what is appropriate for each film.
Finish each job with a deliberate visual check. Inspect the film edges for lifting or inconsistent gaps, scan for visible debris and creases, and look across the pane for a consistent appearance. Follow any manufacturer instructions on inspection timing, since appearance can change during curing.
Edges appear secure and consistent.
No visible debris or persistent creases are overlooked.
The film’s appearance is checked across the full pane.
Any concerns are documented for follow-up.
Apply the same checklist from job to job, then use inspection notes to refine the workflow if similar defects recur. For installers and contractors sourcing window films and professional tinting tools, SolControl is a wholesale supply partner.
Make Your Next Film Installation More Predictable
Good troubleshooting starts with careful observation, not an immediate repair. Record what you see, where it appears, and when it began. Then confirm the film type and follow the manufacturer’s guidance before applying pressure, heat, moisture, or removal methods. This measured approach to troubleshooting window film installation helps avoid unnecessary damage and supports better decisions about correction or reinstallation.
Consistent preparation and final checks can also reduce repeat problems. Inspect the substrate and work area, confirm that tools suit the task, and document results so recurring issues are easier to investigate. Not every mark has the same cause, but a reliable process helps you respond with greater confidence.
SolControl supplies automotive and architectural window films to professional installers, along with professional tinting tools. Explore SolControl’s wholesale window films and professional tools to support a more consistent workflow. With careful diagnosis, product-specific guidance, and appropriate preparation, you can approach the next installation with confidence.
Frequently Asked Questions
Why are there bubbles in my window film after installation?
Bubbles can be trapped moisture, air, or contamination, and their appearance alone may not identify the cause. Small, hazy pockets soon after installation may occur during curing, while larger, clearer bubbles or ones that develop later may need assessment. Check the product’s curing and repair guidance, then note whether the bubbles change. Don’t puncture or press them without manufacturer approval, since that may damage the film or glass.
Will haze in newly installed window film go away on its own?
It may lessen as the film cures, but this depends on the film and installation conditions. Some haze can be part of the post-installation appearance; persistent or worsening cloudiness may need closer review. Check the manufacturer’s guidance for expected curing and inspection timing. Record whether the haze is shrinking, stable, spreading, or changing shape. Don’t apply heat or moisture to speed drying unless the product instructions specifically allow it.
Can you fix creases in window film without replacing it?
Sometimes a manufacturer-approved adjustment may address a minor issue, but a crease can be permanent and may require replacing some or all of the film. The right approach depends on its severity, location, film type, and substrate. Don’t pull, press, or heat a crease as a first step. Confirm the approved repair method with the film documentation or manufacturer, and have an experienced installer assess uncertain cases before rework.
What causes window film to peel or lift at the edges?
Edge lifting may relate to surface preparation, application, film handling, substrate condition, or other product-specific factors. The visible lift doesn’t prove which cause is responsible. Note where it occurs, whether it is spreading, and how long after application it appeared. Check the film manufacturer’s instructions before pressing the edge down or applying heat or moisture. If the lift persists or worsens, seek technical assessment to determine whether correction is appropriate.
How do you remove dust or debris trapped under window film?
Debris sealed beneath film generally can’t be wiped away from the exposed surface. Correcting it may require lifting or replacing a section, and removal can damage the film or substrate if done incorrectly. First confirm that the mark is beneath the film, then check the manufacturer’s repair guidance. Avoid cutting, puncturing, or peeling the film without an approved method. If the appropriate correction is unclear, consult the installer or film manufacturer.
When should an installer redo a window film installation?
Consider reinstallation when a defect such as a persistent crease, trapped contamination, damaged film, or spreading edge lift can’t be corrected using an approved method. Timing matters: follow the manufacturer’s curing and inspection guidance before deciding that a new installation is needed. When troubleshooting window film installation, document the symptom, film type, and changes over time. If the cause or scope is uncertain, consult the manufacturer or an experienced technical resource.
Are automotive and architectural window film installation problems fixed the same way?
No. Automotive and architectural films may involve different film constructions, glazing, substrates, and product instructions, so a correction suitable for one application may not be appropriate for another. Identify the application and exact film before choosing a method. Review the manufacturer’s guidance for that product, especially before using heat, moisture, pressure, or removal techniques. If the glass has unusual coatings or conditions, seek technical review before attempting rework. To see how professional automotive and architectural glass treatments are approached by industry specialists, learn more about Prime Shade & Shine Inc.
Which tools help troubleshoot window film installation problems?
Use clean, well-maintained tinting tools suited to the task and the film manufacturer’s approved procedure. A suitable inspection light or viewing angle can help you document a symptom, while application tools should only be used for corrections the product guidance permits. No tool can confirm the cause by itself, and the wrong tool or technique can worsen damage. Match the equipment to the film, substrate, and specific repair step.